Managing DNS
Customizing DNS Zone Configuration
|
NOTE: This article pertains to the management of DNS for domains subscribed to our Plesk Web Hosting packages. For the management of DNS for domain using Advanced or Premium DNS, please see: See also: Advanced DNS or See also: Premium DNS |
For each new domain name, your Plesk Web Hosting Control Panel automatically creates DNS zone in accordance with the configuration preset defined by Webnames. The domain names should work fine with the automatic configuration, however if you need to perform custom modifications in the domain name zone, you can do that through your control panel.
To view the resource records in a DNS zone of a domain
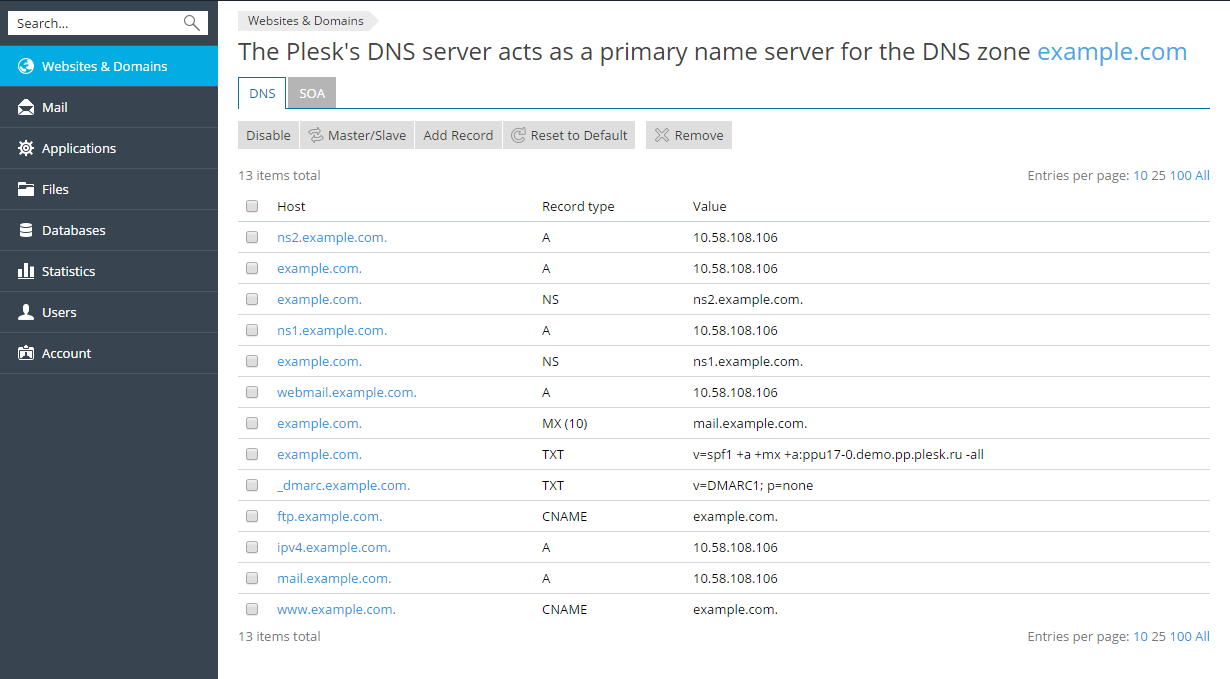
To see the records currently present in a domain’s DNS zone, go to Websites & Domains > the domain name in question >Hosting & DNS > DNS. You can also add, modify, and remove records on this screen.
Adding Resource Records
To add a record, click Add Record. Select a resource record type, and specify the appropriate data:
- For an A record you will need to enter the domain name for which you wish to create an A record. If you are simply defining an A record for your main domain, then you should leave the available field empty. If you are defining an A record for a name server then you will need to input the appropriate entry for the given name server (ie. ns1). Then, you need to enter the appropriate IP address to which to associate the domain name.
- For an NS record, you will need to enter the domain name for which you wish to create the NS record. If you are defining an NS record for your main domain, then you will leave the available field blank. Then enter the appropriate name server name in the field provided. You will need to enter the complete name (i.e. ns1.mynameserver.com).
- For an MX record, you will need to enter the domain for which you are creating the MX record. For the main domain, you would simply leave the available field blank. You will then need to enter your mail exchanger, this is the name of the mail server. If you are running a remote mail server named 'mail.myhostname.com' then you would simply enter 'mail.myhostname.com' into the field provided. You will then need to set the priority for the mail exchanger. Select the priority using the drop-down box: 0 is the highest and 50 is the lowest. Keep in mind you would also need to add the appropriate A record, and/or CNAME if applicable for the remote mail exchange server.
- For a CNAME record, you will need to first enter the alias domain name for which you wish to create the CNAME record. You then need to enter the domain name within which you want the alias to reside. Any domain name can be entered. It does not need to reside on the same server.
- For a PTR record you will first enter the IP address/mask for which you wish to define the pointer. Then enter the appropriate domain name for this IP to be translated to.
- For a TXT record, you will be able to enter an arbitrary text string, which could be a description or an SPF record.
- For a SRV record, you will need to enter the service name, protocol name, port number, and target host. You can also specify the priority of service and weight of service in the appropriate fields.
To modify a record, click its name. To remove a record, select the checkbox next to the record’s name and click Remove. Note that removing certain records will affect the functioning of your domain. For example, removing the A record will prevent it from resolving. If you made changes to the DNS zone that affect the functioning of your website, you can restore the default DNS records by clicking Reset to Default. This will undo all the changes made to the DNS zone and recreate it according to the server-wide DNS template. Note that any custom records you may have added to the zone will be lost.
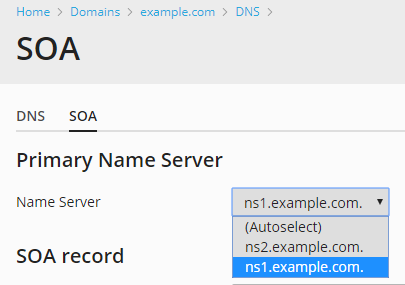
The DNS zone also includes the SOA records template. You can see and change the SOA record values in Websites & Domains > DNS Settings > SOA. Selecting the Use serial number format recommended by IETF and RIPE checkbox changes the way Plesk stores SOA serial numbers from the Unix timestamp to the YYYYMMDDNN format recommended by RIPE. Using the YYYYMMDDNN format is required for many domain registrars, mostly European ones. If your registrar refuses your SOA serial number, enabling this option may help.
You can explicitly specify which name sever will be the trusted source of data for slave name servers by appointing this name server as the primary one for your domain. To do so, under “Primary Name Server”, select the desired name server.
| NOTE: If SOA serial numbers are stored in the format recommended by IETF and RIPE, the number of daily changes of the SOA record is limited by 98 times. If you change a SOA record in a domain 98 times during one day, the SOA serial number cannot be changed any more, clicking the Default button will remove all the records from the DNS zone, and the DNS service for the DNS zone cannot be switched on/off or switched to slave/master mode. |

